

Newsletter #3 - The Game Engine
Creating unique games for the PiTrex #pitrex #vectrex #retrogaming

In the previous newsletters, I have shown all the technical details of the installation and how to create a programming environment as well as install and test the game on the PiTrex.
Also, we have a game skeleton that renders a floor and a cube and allows us to move in the scene (moving the camera).
I want provide a bit more information on that with this newsletter before actually implement game specific things, so you have a rough idea what the game engine is doing and how.
Important
Since the code will change from newsletter to newsletter, don’t forget to update the code on your side using:
$ git pull origin mainThe Game Skeleton
Let’s first take a look at how the “game” code is looking so far
void game_main(void) {
    // 1. Engine request function pointers
    game_fp fp;

    fp.settings = vexxon_settings;
    fp.init = vexxon_init;
    fp.update = vexxon_update;
    fp.pre_render = vexxon_pre_render;
    fp.post_render = vexxon_post_render;
    fp.after_render = vexxon_after_render;
    fp.cleanup = vexxon_cleanup;
    fp.handle_key = vexxon_handle_key;

    engine_set_functions(fp);
}

void vexxon_settings(setting* setting) {
    // 2. Return settings to engine
}

void vexxon_init(camera3d* cam) {
    // 3. Initialise your game and camera here
}

void vexxon_update(float delta, camera3d* cam) {
    // 4. Game logic: Ex. check input, update object positions etc.
}

void vexxon_pre_render(camera3d* cam) {
    // 5. Called before the engine renders (ex. draw background)
}

void vexxon_post_render(camera3d* cam) {
    // 6. Called after the engine renders (ex. draw overlay, text etc.)
}

void vexxon_after_render(void) {
    // 7. Not used for Pitrex
}

void vexxon_cleanup(void) {
    // 8. Game quits, cleanup all here
}

bool vexxon_handle_key(RBEvent event) {
    // 9. Process keys
    return false;
}
This is the file where all the game logic is happening. The structure is quite simple and easy to use:
game_main (1)
This function can only exist once in the project. It’s the main entry point of your game. The only thing you should do here is to fill out game_fp and pass it back to the engine by calling engine_set_functions(fp). Those are called function pointers and are used by the engine to communicate with the game. Below, all 8 function pointers are described. Keep in mind that the names of those functions are not relevant, they just need the parameters and return values defined. This is called a function signature. A good practice is to use the game name followed by the function: ex. vexxon_cleanup()
vexxon_settings (2)
The engine needs to know what the screen size of the game should be. On a pixel screen, this is the real width and height, on the PiTrex it defines the ratio, of the game rendered. It uses internally windows.h from the PiTrex Library. This allows us to work on all platforms with the same coordinates, which is a huge advantage. (The coordinate system of the Vectrex is completely different than on most other systems)
// Used on PiTrex
setting->screen_width = 360*2;
setting->screen_height = 480*2;

// Not used on PiTrex
setting->buffer_width = 360*2;
setting->buffer_height = 480*2;
setting->fullscreen = false;
Here you see the example I use for Vexxon. With these values, it looks nice on Windows, but also on Vectrex itself. Since the Vectrex doesn’t use a pixel buffer but only lines, buffer_width and buffer_height are not needed on the PiTrex. The same is for fullscreen which has just an effect on Windows (and macOS or Linux).
vexxon_init (3)
The init is used to create your game objects and other game assets you will use later. Currently, I just create a cube there as a sample. We see later what else we can do and also how to use a level file instead.
cube_id = game_object_create(GAME_OBJECT_CUBE);
game_object_set_pos(cube_id, 0, 3, 10, COORDINATE_IS_ABSOLUITE);
The first statement creates a cube and the second statement set its position. As you see we use only an ID here. The object itself and all its data get managed internally by the game engine. The parameters are self-explaining. At first, the ID is passed in, followed by the x,y, and z coordinate. The last parameter defines if the coordinates are absolute or relative to the current ones.
vexxon_update (4)
In the update function, we check the input controller (or keyboard on Windows) and update the game objects and camera (among other things)
game_object_set_rot(cube_id, 0, 1/delta, 0, COORDINATE_IS_RELATIVE);

cam->pos.z += _speed;

if (input_get_control(CONTROL_LEFT)) {
    cam->pos.z += _moving*sin(t);
    cam->pos.x -= _moving*cos(t);
}
Let’s take a look at the first statement. It’s quite similar to game_object_set_pos which we used before, but here we change the rotation (Euler angles) of the cube. The parameters are quite similar. At first again the ID, followed by the angle you want to rotate around the x, y, and z axe, followed by the last parameter that defines that we rotate relative to the current values (add or subtract an angle).
Important to know is that whenever you change a value in the update function, you have to divide it by delta. This is the time elapsed in milliseconds since the function was the last time called. It guarantees a steady frame rate independent of the machines speed (CPU power).
Also you see here how we can manipulate the camera object to look from another perspective or move around in the game scene. We implement later other camera behaviour too, but that’s for now to play around.
vexxon_pre_render (5)
This function get’s called before the engine renders the objects (we have one cube for now). It’s a good place to render background, landscape etc.
// Fill background
graphics_fill(draw_getgb(), ARGB_BLACK);

// Get resolution (width, height)
pixel res = draw_getres();

// Draw fix horizontal line (horizon)
draw_setcolor(ARGB_GREY);

double hpos = (0.5+tan(cam->rot.x)*cam->fov)*res.y;
draw_line((vec2){0.0, hpos}, (vec2){res.x, hpos});

// Draw horizontal lines in 3d space (floor)
draw_setcolor(ARGB_BLUE);

for (int i = 0; i < 10; i++) {
    vec3 start = {-15, 0, i*30};
    vec3 end = {15, 0, i*30};

    draw3d_line(start, end, *cam);
}
vexxon_post_render (6)
In the post_render function we draw stuff that must be always on top. In our case the information text that displays the game name and key mapping.
UNUSED_VAR(cam);

draw_setcolor(ARGB_WHITE);
vtext_draw_string(10, 10, "VEXXON", 1.0f);

draw_setcolor(ARGB_YELLOW);
vtext_draw_string(10, 40, "ARROW LEFT   MOVE LEFT", 0.5f);
vtext_draw_string(10, 50, "ARROW RIGHT  MOVE RIGHT", 0.5f);
vtext_draw_string(10, 60, "ARROW UP     MOVE FORWARD", 0.5f);
vtext_draw_string(10, 70, "ARROW DOWN   MOVE BACK", 0.5f);
vtext_draw_string(10, 80, "BUTTON 1     MOVE UP", 0.5f);
vtext_draw_string(10, 90, "BUTTON 2     MOVE DOWN", 0.5f);
vexxon_after_render (7)
The after_render function is not used on the PiTrex.
vexxon_cleanup (8)
As the name says, here we cleanup all things we have created in the init function. Objects that are handled by the engine are also cleanup by the engine. So for now, nothing to do!
vexxon_handle_key (9)
For the game itself we handle keys in the update function. This function is used to either overwrite keys handled by the engine. If you do so return true. The second case is to use this function for non game related keys. In our case, nothing to do at the moment, so we just return false.
Camera
As you have seen in the update, pre_render and post_render function, a parameter is passed from the engine called cam. It’s a virtual camera that was created by the engine and used to move around in the game scene
The camera object is essential in a 3D game to provide the right perspective. In Vexxon we don’t move the camera like we would do in a 1st person shooter for example but instead a space fighter is moved and we let the camera follow this space fighter
Start Coding The Game
For now, the game doesn’t look like a real game or even Vexxon in particularly, so lets work on that at first. The first changes and additions would be like this:
Use a cube that acts like a space fighter
Let the camera follow the fighter
Move the fighter instead of the camera when we use the input control
Let’s see what code we need to realize that:
void vexxon_init(camera3d* cam) {
    // Follow
    // cam->pos = vec3_make(0.0f, 2.0f, 0.0f);
    // cam->rot = vec3_make(0.0f, 0.0f, 0.0f);

    // ISO view
    cam->pos = vec3_make(7.82f, 4.37f, 1.82f);
    cam->rot = vec3_make(0.0f, -0.43f, 0.0f);

    // Player/Space fighter
    player_id = game_object_create(GAME_OBJECT_CUBE);
    game_object_set_pos(player_id, 0.0f, 1.0f, 10.0f, COORDINATE_IS_ABSOLUTE);
    game_object_set_speed(player_id, 0, 0, player_speed);

    // Get camera offset for later update
    vec3 pos = game_object_get_position(player_id);
    camera_x_offset = pos.x - cam->pos.x;

    // Create some random level elements
    for (int i = 0; i < 10; i++) {
        int id = game_object_create(GAME_OBJECT_CUBE);

        int offset = random_int(-5, 5);
        int scale = random_int(1, 5);

        game_object_set_pos(id, 0.0f+offset, 1.0f, i*30.0f+15.0f, COORDINATE_IS_ABSOLUTE);
        game_object_set_scl(id, scale, 1.0f, 1.0f, COORDINATE_IS_ABSOLUTE);
        game_object_set_color(id, ARGB_RED);
    }

    return;
}
At first we add a cube which we use as player for now and define the position and (that’s new) apply some velocity with game_object_set_velocity.
After that we add some random cube’s to have something to fly over. That’s all we need to add/change in the init function. Now let’s take a look in the update function:
// Move camera forward
    cam->pos.z += player_speed * delta;

    if (input_get_control(CONTROL_LEFT)) {
        game_object_set_pos(player_id, -player_movement * delta, 0.0f, 0.0f, COORDINATE_IS_RELATIVE);

        vec3 pos = game_object_get_position(player_id);
        if (pos.x < -FLIGHT_WIDTH_LIMIT) {
            game_object_set_pos(player_id, -FLIGHT_WIDTH_LIMIT, pos.y, pos.z, COORDINATE_IS_ABSOLUTE);
        }
    }
    if (input_get_control(CONTROL_RIGHT)) {
        game_object_set_pos(player_id, player_movement * delta, 0.0f, 0.0f, COORDINATE_IS_RELATIVE);

        vec3 pos = game_object_get_position(player_id);
        if (pos.x > FLIGHT_WIDTH_LIMIT) {
            game_object_set_pos(player_id, FLIGHT_WIDTH_LIMIT, pos.y, pos.z, COORDINATE_IS_ABSOLUTE);
        }
    }

    vec3 player_pos = game_object_get_position(player_id);
    cam->pos.x = player_pos.x - camera_x_offset;

    if (input_get_control(CONTROL_UP)) {
        game_object_set_pos(player_id, 0.0f, player_movement * delta, 0.0f, COORDINATE_IS_RELATIVE);

        vec3 pos = game_object_get_position(player_id);
        if (pos.y > FLIGHT_HEIGHT_LIMIT) {
            game_object_set_pos(player_id, pos.x, FLIGHT_HEIGHT_LIMIT, pos.z, COORDINATE_IS_ABSOLUTE);
        }
    }
    if (input_get_control(CONTROL_DOWN)) {
        game_object_set_pos(player_id, 0.0f, -player_movement * delta, 0.0f, COORDINATE_IS_RELATIVE);

        vec3 pos = game_object_get_position(player_id);
        if (pos.y < FLIGHT_FLOOR_LIMIT) {
            game_object_set_pos(player_id, pos.x, FLIGHT_FLOOR_LIMIT, pos.z, COORDINATE_IS_ABSOLUTE);
        }
    }
In the update function we handle the user input and move the player cube and the camera. While they are some line’s needed to implement that, the majority of the the lines are needed to test which key is pressed and if the player is still in the allowed space. If the player flies to much left or right or moves to high or to close to the floor the code limits it.
One “speciality here is maybe that we automatically set the speed of the player but the camera position we set manually. This is needed because I want always have the same distance between the player and the camera and since we limit the player movements we have to apply this offset after the player position was updated and (if needed) limited.
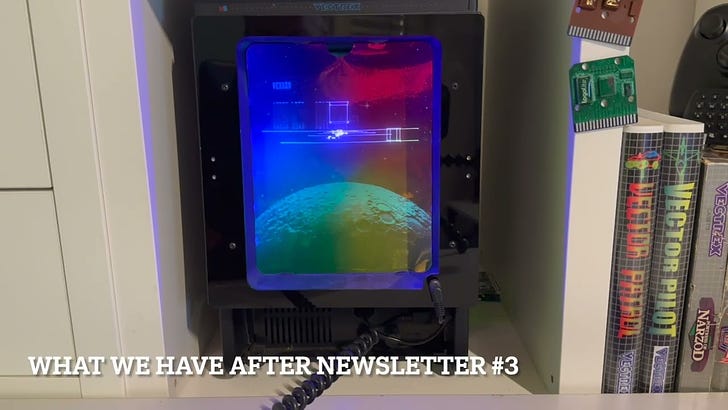
This is the result of the above changes
Level Files
One important feature you have seen already but is not used by now in the code is the possibility to define a game level in a file. It allows to creation the game level without coding but just by changing the content of the file.
The level file is for now perfect for a game like Vexxon but I will improve it over time, so it will be possible to create any type of game with it.
What’s Next?
In the next Newsletter, we will use the level file instead of manually creating all objects. Also, we add the code needed to support the level file and make some optimizations for the Vectrex to limit the number of lines drawn per cycle!
Hi Roger! Just wanted to let you know that your postings have successfully got me to a working playground and communicating with the PiTrex.
One issue that I continue to think about involving vector rendering is z-buffering (yes, that is probably not the right term in this case since this isn't a raster-based render). I have been really trying to think of a way to cull lines that can't be seen. From my own experience, the actual drawing of vectors is the most time-consuming part of each cycle. But, since we are now using a much faster processor, it should be possible to remove unwanted lines before rendering. Back-face culling is straight forward enough, but removing obscured front-facing vectors seems to be the challenge.
Any thoughts?
-Stefan